How to Set Up a TESmart KVM Switch for Two Computers and One Monitor
In this guide, I’ll show you how I installed a new TESmart KVM switch for my computer setup. A KVM switch, which stands for keyboard, video, and mouse, lets you control more than one computer using the same keyboard, mouse, and monitor.
For my setup, I’m using two computers, one HDMI monitor, one keyboard, and one mouse. Since everything in my system uses HDMI, I chose a TESmart HDMI KVM switch that supports two computers and one monitor.
What Is a KVM Switch?
A KVM switch is a handy device that lets you switch between multiple computers without needing separate keyboards, mice, or monitors for each one. This is especially useful if you have a main work computer and a second computer for email, monitoring comments, or other background tasks.
What Comes in the Box?
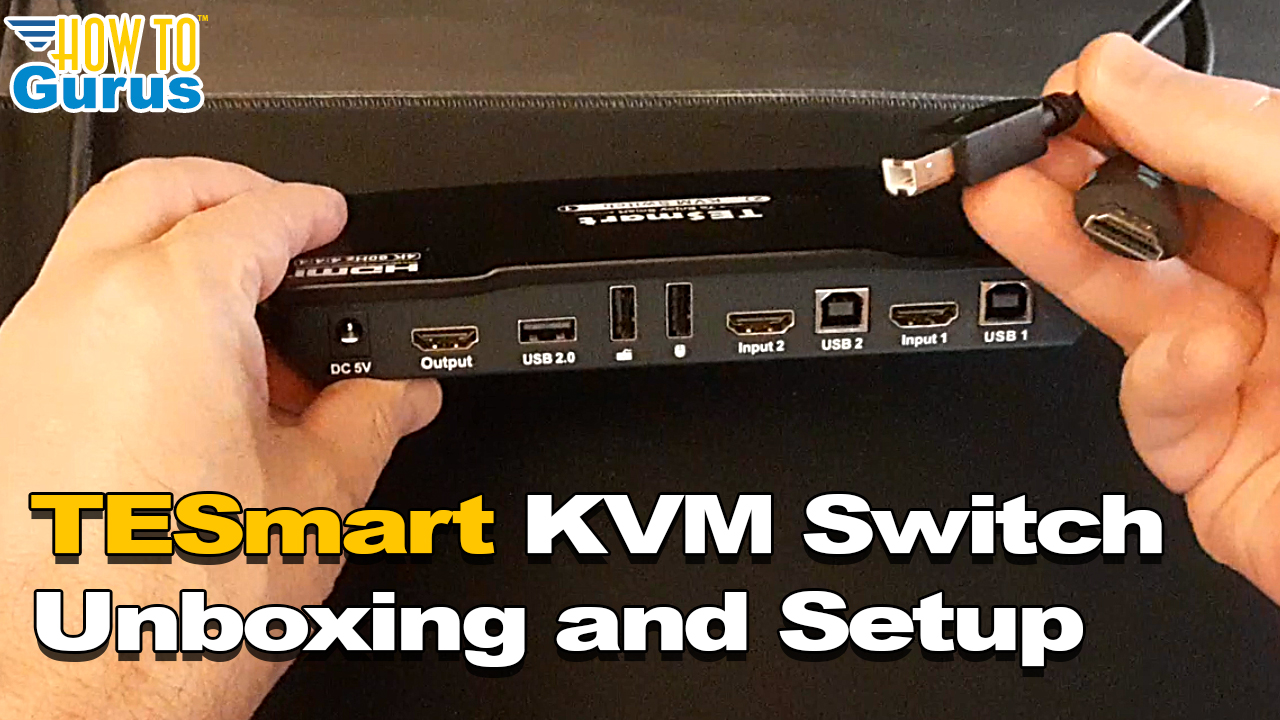
Inside the TESmart KVM switch package, you get the main KVM switch, a user manual, a power supply, a remote control, and two cable sets. Each cable set includes one HDMI cable and one USB cable, so you have what you need to connect two computers.
- TESmart HDMI KVM switch
- User manual
- Power adapter
- Remote control
- Two HDMI cables
- Two USB cables
The switch itself has a solid metal case, a clean front panel, rubber feet on the bottom, and all of the connection ports on the back.
My Two-Computer Setup
In this setup, I’m connecting two computers to one monitor. My older Lenovo ThinkCentre is used for email and keeping an eye on YouTube comments, while my newer HP office computer is used for my main work, video creation, and Photoshop Elements projects.
Connecting the Computers
Each computer needs both an HDMI connection and a USB connection going into the KVM switch. The HDMI cable carries the video signal, while the USB cable allows the keyboard and mouse to control the selected computer.
After connecting the computer-side cables, I plugged the right-side computer into the correct set of KVM ports and the left-side computer into the other set of ports. Since the switch is viewed from the back while plugging things in, it helps to double-check the cable direction before turning the switch around.
Connecting the Keyboard, Mouse, Monitor, and Power
Once the computers were connected, I plugged the keyboard into the keyboard USB port, the mouse into the mouse USB port, and my USB extender into the utility USB port. The USB extender is used for my printer and a few other accessories.
Next, I plugged the monitor’s HDMI cable into the HDMI output port on the KVM switch. Finally, I connected the power supply and turned the switch on using the power button.
Ways to Switch Between Computers
The TESmart KVM switch gives you several ways to switch between computers. You can use the button on the front of the switch, the included remote control, a keyboard shortcut, or even a mouse gesture.
- Press the button on the front panel
- Use the included remote control
- Tap Scroll Lock twice, then press Page Up or Page Down
- Tap the right side of the screen twice with the mouse
Fixing a Mouse Software Issue
The only issue I ran into was with my Corsair Harpoon mouse. The mouse worked with the switch, but the Corsair iCUE software did not recognize it correctly. I had the same issue with my previous KVM switch, so this appears to be a software issue rather than a problem with the TESmart switch.
The fix was simple. I unplugged the mouse from the dedicated mouse port on the KVM switch and plugged it into the USB hub connected to the utility USB port instead. After that, the mouse software worked properly.
Cleaning Up the Desk Setup
After testing the switch for a while, I moved it from beside the monitor to a small shelf below my main monitor shelf. This made the setup much cleaner because the top shelf helps hide the cables.
Final Thoughts
After using the TESmart KVM switch for a couple of days, I’m very happy with how it works. It was easy to set up, easy to use, and I like having several different ways to switch between computers.
If you use two computers at the same desk and want to control them with one keyboard, one mouse, and one monitor, a KVM switch like this can make your setup much cleaner and easier to manage.
Check Here to learn more about TESmart KVM switches https://www.tesmart.com/